Save
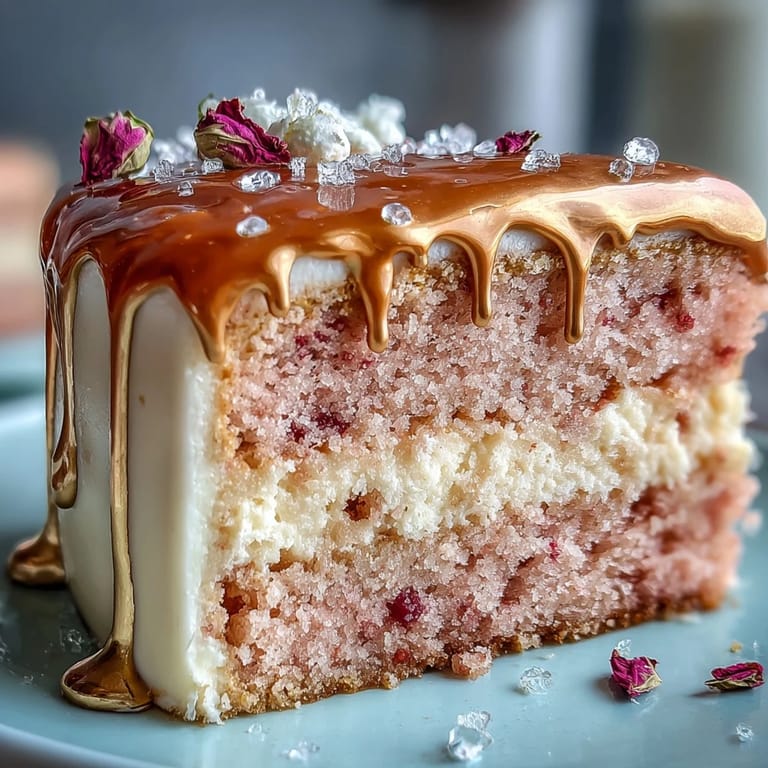
Save The scent of rosé mingling with sweet vanilla and melted chocolate instantly brings back memories of a sunlit kitchen filled with laughter the day before my cousin's bridal shower. I wasn't expecting a cake to feel so celebratory just while stirring the batter but the anticipation seemed to shimmer through every pink-specked swirl. The gold drip was a last-minute touch—something that seemed almost too fancy until we brushed it on and everyone couldn't stop peeking in the fridge to admire it. It's just one of those showstopper cakes with a touch of mischief and a sense it's made for a truly joyful moment. Honestly sometimes a cake teaches you as much about celebration as it does about patience.
We cut into this cake in a garden, the gold drips glinting in the late afternoon sun, and the bride-to-be's friends gasped before they ever tasted it. There was a tiny debate over who would get the biggest piece with the glossiest drip, and someone tried (unsuccessfully) to sneak an extra rose petal for their plate. Still, even after all the effort, seeing everyone's faces light up made every smudge of gold luster on my fingers utterly worth it.
Ingredients
- All-purpose flour: Sifting first means a cake crumb that stays light and never clumpy—take the extra minute.
- Granulated sugar: Gives structure and balances the slight tang from the rosé and buttermilk.
- Baking soda: Just a teaspoon is the key for a gentle rise that doesn't crack the top.
- Fine salt: I've learned a pinch sharpens every bite and doesn't make it salty.
- Cocoa powder (unsweetened): Only a spoonful deepens the color so the pink feels rich, not pastel and weak.
- Vegetable oil: This keeps the cake soft even straight from the fridge.
- Eggs: Room temp eggs blend in more easily—cold eggs have caused frosting drama in the past.
- Buttermilk: Tanginess helps balance sweetness—don't skip it or sub with milk alone.
- Rosé wine: The floral notes come through only if you use a good, dry rosé.
- Vanilla extract: The secret for rounding out both cake and buttercream flavors.
- White vinegar: A classic velvet cake trick for tenderness you can feel as you cut.
- Pink or rose gel food coloring: Gel keeps the color strong without thinning your batter.
- Unsalted butter: Room temperature so your buttercream turns plush, not lumpy.
- Powdered sugar: Always sift to avoid any lumps in your velvety frosting.
- Heavy cream: Melts with white chocolate to create that irresistible, glossy drip.
- White chocolate chips: The gold drip needs a smooth base—cheap chips sometimes split, so use good ones.
- Edible gold luster dust: Make sure it's edible, not just food-safe for decoration.
- Vodka or clear lemon extract: Helps make the edible gold paint; it evaporates quickly and gives shine.
- Optional decorations: Edible rose petals and fresh berries always make it feel even more special.
Tired of Takeout? 🥡
Get 10 meals you can make faster than delivery arrives. Seriously.
One email. No spam. Unsubscribe anytime.
Instructions
- Prep the cake pans:
- Grease and line three 8-inch pans with parchment, making sure the corners are tucked tight so nothing sticks later.
- Mix dry ingredients:
- Sift flour, sugar, baking soda, salt, and cocoa into a big bowl; listen for the gentle thud as the last scoop falls.
- Combine the wet mix:
- Whisk oil, eggs, buttermilk, rosé, vanilla, and vinegar together—take in that faint, floral aroma.
- Color and finish the batter:
- Gently stir wet into dry ingredients, stopping as soon as it looks even; swirl in pink gel until you’re happy with the shade.
- Bake the cake layers:
- Pour into pans and bake 30-35 minutes until a toothpick comes out mostly clean—your kitchen will smell like a patisserie.
- Cool completely:
- Let cakes rest in the pans for 10 minutes, then tip onto racks and breathe in that fresh-baked sweetness as they cool down.
- Make the buttercream:
- Beat butter until pale and fluffy, then add powdered sugar one cup at a time, tasting as you go so it doesn’t get too sweet.
- Finish buttercream texture:
- Add rosé, vanilla, and a pinch of salt, and keep beating a few minutes until spreadable and airy—add more wine if you need to loosen it up.
- Stack and crumb-coat:
- Level the cakes, then stack with buttercream between layers; give the whole cake a thin crumb-coat and chill so the final layer goes on smooth.
- Final coat and gold drip prep:
- Spread on a lush final layer of buttercream and pop the cake in the fridge; melt white chocolate and cream together for the gold drip, stirring until shiny and smooth.
- Create the gold drip:
- Cool the white chocolate, drip it over the cake’s edge, and once set, paint with edible gold mixed with vodka or extract—tiny brushstrokes make each drip unique.
- Decorate and serve:
- Add edible rose petals, berries, or extra gold touches for that last bit of drama, then let everyone admire before you slice in.
 Save
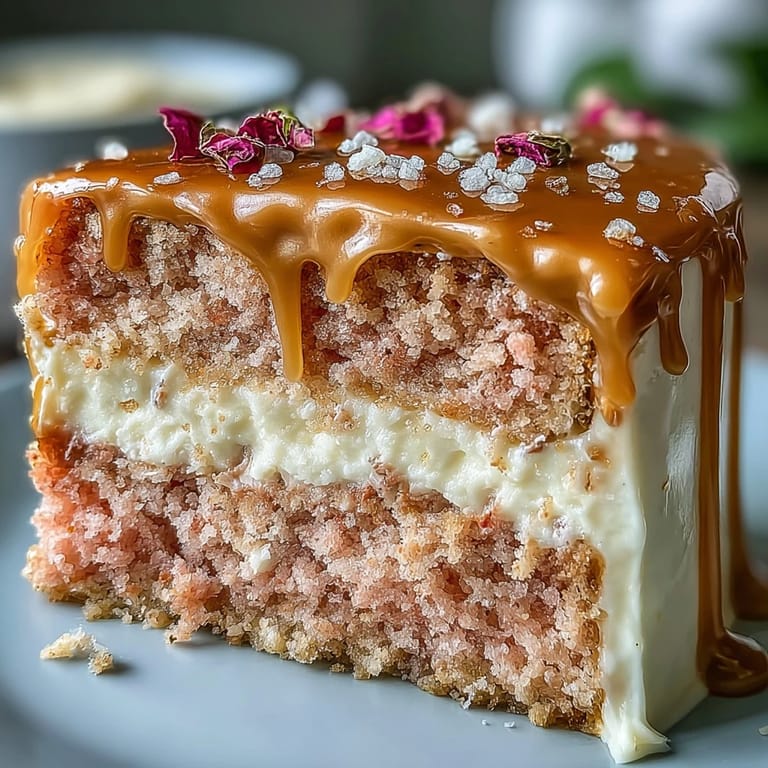
Save After the last candle was blown out and most plates were clean, someone quietly wrapped up a leftover slice in foil to sneak home—a tiny edible keepsake from the party. That single piece, glinting with gold even hours later, was a sweet reminder of the joy the cake brought to everyone gathered that day.
How to Make the Gold Drip Shine
I’ll admit, my first attempt at a gold drip had more splatters than elegance, but once I combined a tiny bit of vodka with the edible luster dust, suddenly the paint glided on like a charm. Use a small, clean paintbrush, and don’t rush the brushstrokes—they set surprisingly fast once the chocolate surface is cool. For the richest shine, go over each drip twice with the gold paint, letting the first layer dry before the second.
Choosing the Right Rosé
Rosé matters here, and I found the difference between a fruity bottle and a dry one completely changes the cake. Even a lightly sparkling rosé will give the crumb a little fragrance and lift. It’s become a fun excuse for a mini tasting, and the leftover wine never lasts long once the baking’s done.
Troubleshooting and Last Second Fixes
If your buttercream is too thick, add extra rosé just a teaspoon at a time until creamy—it’s easy to fix mid-mix. If any drips slide off too quickly, your cake might be too warm or your chocolate too runny, so pause and chill again. Finally, the bold pink will fade if overbaked, so keep an eye on timing for the dreamiest hue.
- Have paper towels and wipes on hand when painting gold—this gets messy quick.
- Move the cake to your serving board before you start dripping or painting to avoid accidents.
- You can always add fresh edible flowers to hide any little mistakes.
 Save
Save This pink velvet cake may steal the show, but honestly, the best part is how it brings people together for a real celebration. The laugh lines and gold fingerprints across the table were the best souvenir of all.
Recipe FAQ
- → Can I substitute the rosé wine?
Yes. Use a dry or sparkling rosé for subtle floral notes; for a nonalcoholic option, replace with a mix of grape juice and a splash of lemon to maintain acidity and flavor balance.
- → How do I keep the buttercream stable?
Beat butter until light, add powdered sugar gradually, and chill the assembled cake between crumb coat and final icing. If buttercream becomes too soft, refrigerate briefly and rewhip before finishing.
- → Best way to get clean gold drips?
Pour a cooled but pourable white-chocolate drip from the center toward edges, letting it fall naturally. Let the drip set, then paint with edible gold luster mixed with vodka or clear extract using a small food-safe brush.
- → How do I prevent sinking or uneven layers?
Level each cooled layer with a serrated knife or cake leveler, avoid overmixing batter, and bake until a toothpick comes out clean. Cool in pans 10 minutes before turning out to reduce collapse.
- → Can this be made ahead and stored?
Yes. The cake can be assembled a day ahead and refrigerated; bring to room temperature before serving. Store loosely covered to protect the gold finish and delicate buttercream texture.
- → Any tips for coloring the batter evenly?
Use gel food coloring for vibrant pink without thinning the batter. Add a small amount, mix gently, and adjust until you reach the desired rosy shade to avoid overworking the batter.